
 OpenStack 控制节点基本环境和身份验证服务的安装部署
 OpenStack Networking(neutron) 需要一个控制节点(controller node)、一个网络节点(networknode)以及至少一个计算节点(compute node)。
一、物理环境部署
1.物理环境规划
表1.1. OpenStack环境部署

二、安装前的部署
1.1配置主机名
root@controller:~# vim /etc/hostname controller
1.2 配置IP地址
root@controller:~# vim /etc/network/interfaces auto eth0 iface eth0 inet static address 192.168.100.100 netmask 255.255.255.0 gateway 192.168.100.2
1.3 配置名称解析hosts
root@network:~# vim /etc/hosts # controller 192.168.100.100 controller # network 192.168.100.101 network # compute1 192.168.100.102 compute1
2. 网络时间协议ntp
2.1 安装ntp服务器
root@controller:~# sudo apt-get install ntp
2.2 配置/etc/ntp.conf 服务
server ntp.ubuntu.com iburst restrict -4 default kod notrap nomodify restrict -6 default kod notrap nomodify
2.3重启ntp服务
root@controller:~# sudo /etc/init.d/ntprestart
3.系统升级更新
3.1 更新openstack 仓库源
root@controller:~#sudo apt-get install ubuntu-cloud-keyring root@controller:~#sudo vim/etc/apt/sources.list.d/cloudarchive-kilo.list deb http://ubuntu-cloud.archive.canonical.com/ubuntutrusty-updates/kilo main
3.2升级软件包,如果升级过程中包含内核的升级,需要重启服务器。
root@controller:~# apt-get update root@controller:~# sudo apt-getdist-upgrade
三、安装数据库
1. 安装数据库软件包并设置数据库账户root密码
root@controller:~# sudo apt-get installmariadb-server python-mysqldb
2. 配置/etc/mysql/my.cnf
bind-address = 192.168.100.100 default-storage-engine = innodb innodb_file_per_table collation-server = utf8_general_ci init-connect = 'SET NAMES utf8' character-set-server = utf8
3.重启mysql服务
root@controller:~# sudo /etc/init.d/mysql restart * Stopping MariaDBdatabase server mysqld[OK] * Starting MariaDB database server mysqld [ OK ] * Checkingfor corrupt, not cleanly closed and upgrade needing tables.
4.数据库安全加固
root@controller:~# mysql_secure_installation /usr/bin/mysql_secure_installation: 379:/usr/bin/mysql_secure_installation: find_mysql_client: not found NOTE: RUNNING ALL PARTS OF THIS SCRIPT IS RECOMMENDED FORALL MariaDB SERVERS INPRODUCTION USE! PLEASE READ EACH STEPCAREFULLY! In order to log into MariaDB to secure it, we'll need thecurrent password for the root user. If you've just installed MariaDB, and you haven't set the root password yet, the password willbe blank, so you should just press enter here. Enter current password for root (enter for none): OK, successfully used password, moving on... Setting the root password ensures that nobody can loginto the MariaDB root user without the proper authorisation. You already have a root password set, so you can safelyanswer 'n'. Change the root password? [Y/n] y New password: Re-enter new password: Password updated successfully! Reloading privilege tables.. ... Success! By default, a MariaDB installation has an anonymous user,allowing anyone to log into MariaDB without having to have a user accountcreated for them. This isintended only for testing, and to make the installation go a bit smoother. You should remove them before moving into a production environment. Remove anonymous users? [Y/n] y ... Success! Normally, root should only be allowed to connect from'localhost'. This ensures that someone cannot guess at the root passwordfrom the network. Disallow root login remotely? [Y/n] y ... Success! By default, MariaDB comes with a database named 'test'that anyone can access. This isalso intended only for testing, and should be removed before moving into a production environment. Remove test database and access to it? [Y/n] y - Dropping testdatabase... ERROR 1008 (HY000) at line 1: Can't drop database 'test';database doesn't exist ... Failed! Not critical, keep moving... - Remolvs DR模式 +keepalived 实现directory 高可用、httpd服务负载均衡集群 阅读原文»功能:
lvs+keepalived高可用负载均衡集群中:
keepalived负责后端real server健康状态检查
如果一台real server服务出现故障,则会从集群服务中剔除,等恢复之后再自动加入到集群。
keepalived负责负载均衡器(directory server)高可用
A和B两台虚拟机装lvs+keepalived(主)和lvs+keepalived(备),但是对外表现为一个虚拟IP,主服务器会发送消息给备服务器,当备服务器收不到消息的时候,认为主出现故障,然后接管虚拟IP继续提供服务,如果主节点恢复,则再次接管虚拟IP,提供服务。
原理:
使用layer3工作时,keepalived定期向服务器群组中发送icmp的数据包,如果某台服务器IP地址没有激活,则认为失效,并剔除(典型例子就是 这台服务器被非法关机)
使用layer4工作时,比如是web 80端口的负载均衡,keepalived检测后端服务器群组中的80端口有没有启动,如果没有,则认为失效,并剔除
使用layer7工作时,根据用户设定,如果与用户设定的不符,则认为失效,并剔除
三个模块:
core:负责主进程的启动、维护,全局配置文件的加载和解析
health_check:负载健康状态检查
vrrp:实现vrrp协议
实验:
主节点和备节点把keepalived启动,web1和web2启动httpd,
架构设计:
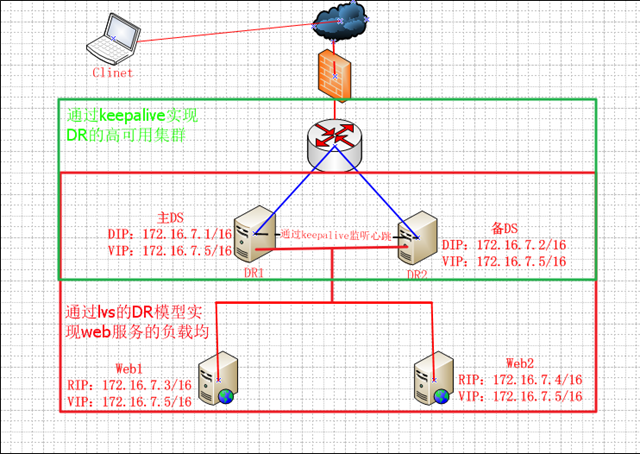
利用keepalived来实现lvs的Directory server的高可用,再利用lvs和keepalived的高可用,来实现Web服务的负载均衡!架构图如下

本文中的keepalived是检测Real server的健康状态以及负载均衡器的主和备之间的故障转移。
检测real server健康状态:如果有一台web服务器宕机或者出现故障,keepalived会检测到,并从集群群组中剔除,等恢复后,再自动添加进来
负载均衡器故障转移:一个web服务器至少需要两台keepalived,一台为主节点(Master),一台为备节点(backup),但对外表现为一个虚拟IP,主服务器会发送组播,如果备服务器收不到vrrp包就认定主服务器出现故障,就会接管虚拟IP,继续对外提供服务,从而保证了高可用性。
搭建:
重点 时间同步
各个节点能互相解析
(1)准备环境
1.主备节点都装lvs和keepalived
2.web1和web2都装httpd
3.关闭防火墙
4.关闭SELinux
5.web1和web2都要抑制ARP
(2)主节点
安装ipvsadm和keepalived yum -y install keepalived ipvsadm 关闭防火墙 service iptables stop 关闭SELinux setenforce 0修改keepalived配置文件 vim /etc/keepalived/keepalived.conf
vrrp_instance VI_1 { state MASTER #备用服务器上为 BACKUP interface eth0 virtual_router_id 51 priority 100 #备用服务器上为90 advert_int 1 authentication { auth_type PASS auth_pass 1111 } virtual_ipaddress { 172.16.7.5 } } virtual_server 172.16.7.5 80 { delay_loop 6 #每隔6秒查询realserver状态 lb_algo wrr #lvs 算法 lb_kind DR #lvs 模式 persistence_timeout 60 #同一IP的连接60秒内被分配到同一台realserver protocol TCP #指定转发协议类型,有TCP和UDP两种 real_server 172.16.7.3 80 { weight 3 #权重 TCP_CHECK { connect_timeout 3 #表示3秒无响应,则超时 nb_get_retry 3 #表示重试次数 delay_before_retry 3 #表示重试间隔 connect_port 80 #端口为80 } } real_server 172.16.7.4 80 { weight 1 TCP_CHECK { connect_timeout 3 nb_get_retry 3 delay_before_retry 3 connect_port 80 } } }(3)备节点
安装ipvsadm和keepalived yum -y install keepalived ipvsadm 关闭防火墙 service iptables stop 关闭SELinux setenforce 0修改keepalived配置文件vim /etc/keepalived/keepalived.conf
只需要修改两处:
NO.1 "state MASTER" 修改为 "state BACKUP"
NO.2 "priority 100" 修改为 "priority 99"
(4)web1和web2
安装ipvsadm和keepalived yum -y install keepalived ipvsadm 关闭防火墙 service iptables stop 关闭SELinux setenforce 0 安装httpd yum -y install httpd 抑制ARP echo 2 > /proc/sys/net/ipv4/conf/all/arp_announce echo 2 > /proc/sys/net/ipv4/conf/eth0/arp_announce echo 1 > /proc/sys/net/ipv4/conf/all/arp_ignore echo 1 >/proc/sys/net/ipv4/conf/eth0/arp_ignore 添加VIP ifconfig lo:0 192.168.1.10 broadcast 192.168.1.10 netmask 255.255.255.255 添加路由 route add -host 192.168.1.10 dev lo:0测试
测试健康检查:主节点和备节点启动keepalived,web1和web2启动httpd,主节点上查看ipvs规则,能看到web1和web2,ip addr 查看主节点vip,停止web1的httpd服务,主节点上再次查看ipvs规则,web1规则消失,测试成功
测试故障转移:主节点和备节点启动keepalived,web1和web2启动httpd。停止主节点上的keepalived,查看备节点是否接管VIP,继续提供web服务,如果能,测试成功
测试故障恢复:主节点出现故障,keepalived出现故障停止,备节点接管VIP,继续提供web服务。如果主节点恢复,重新启动keepalived,查看vip是否漂移回来,主节点接管备节点服务,继续提供服务。
本文出自 "翟军铭的linux博客" 博客,请务必保留此出处http://zhaijunming5.blog.51cto.com/10668883/1690317


没有评论:
发表评论